


Can Solar Panels Be Installed on a Tile Roof?
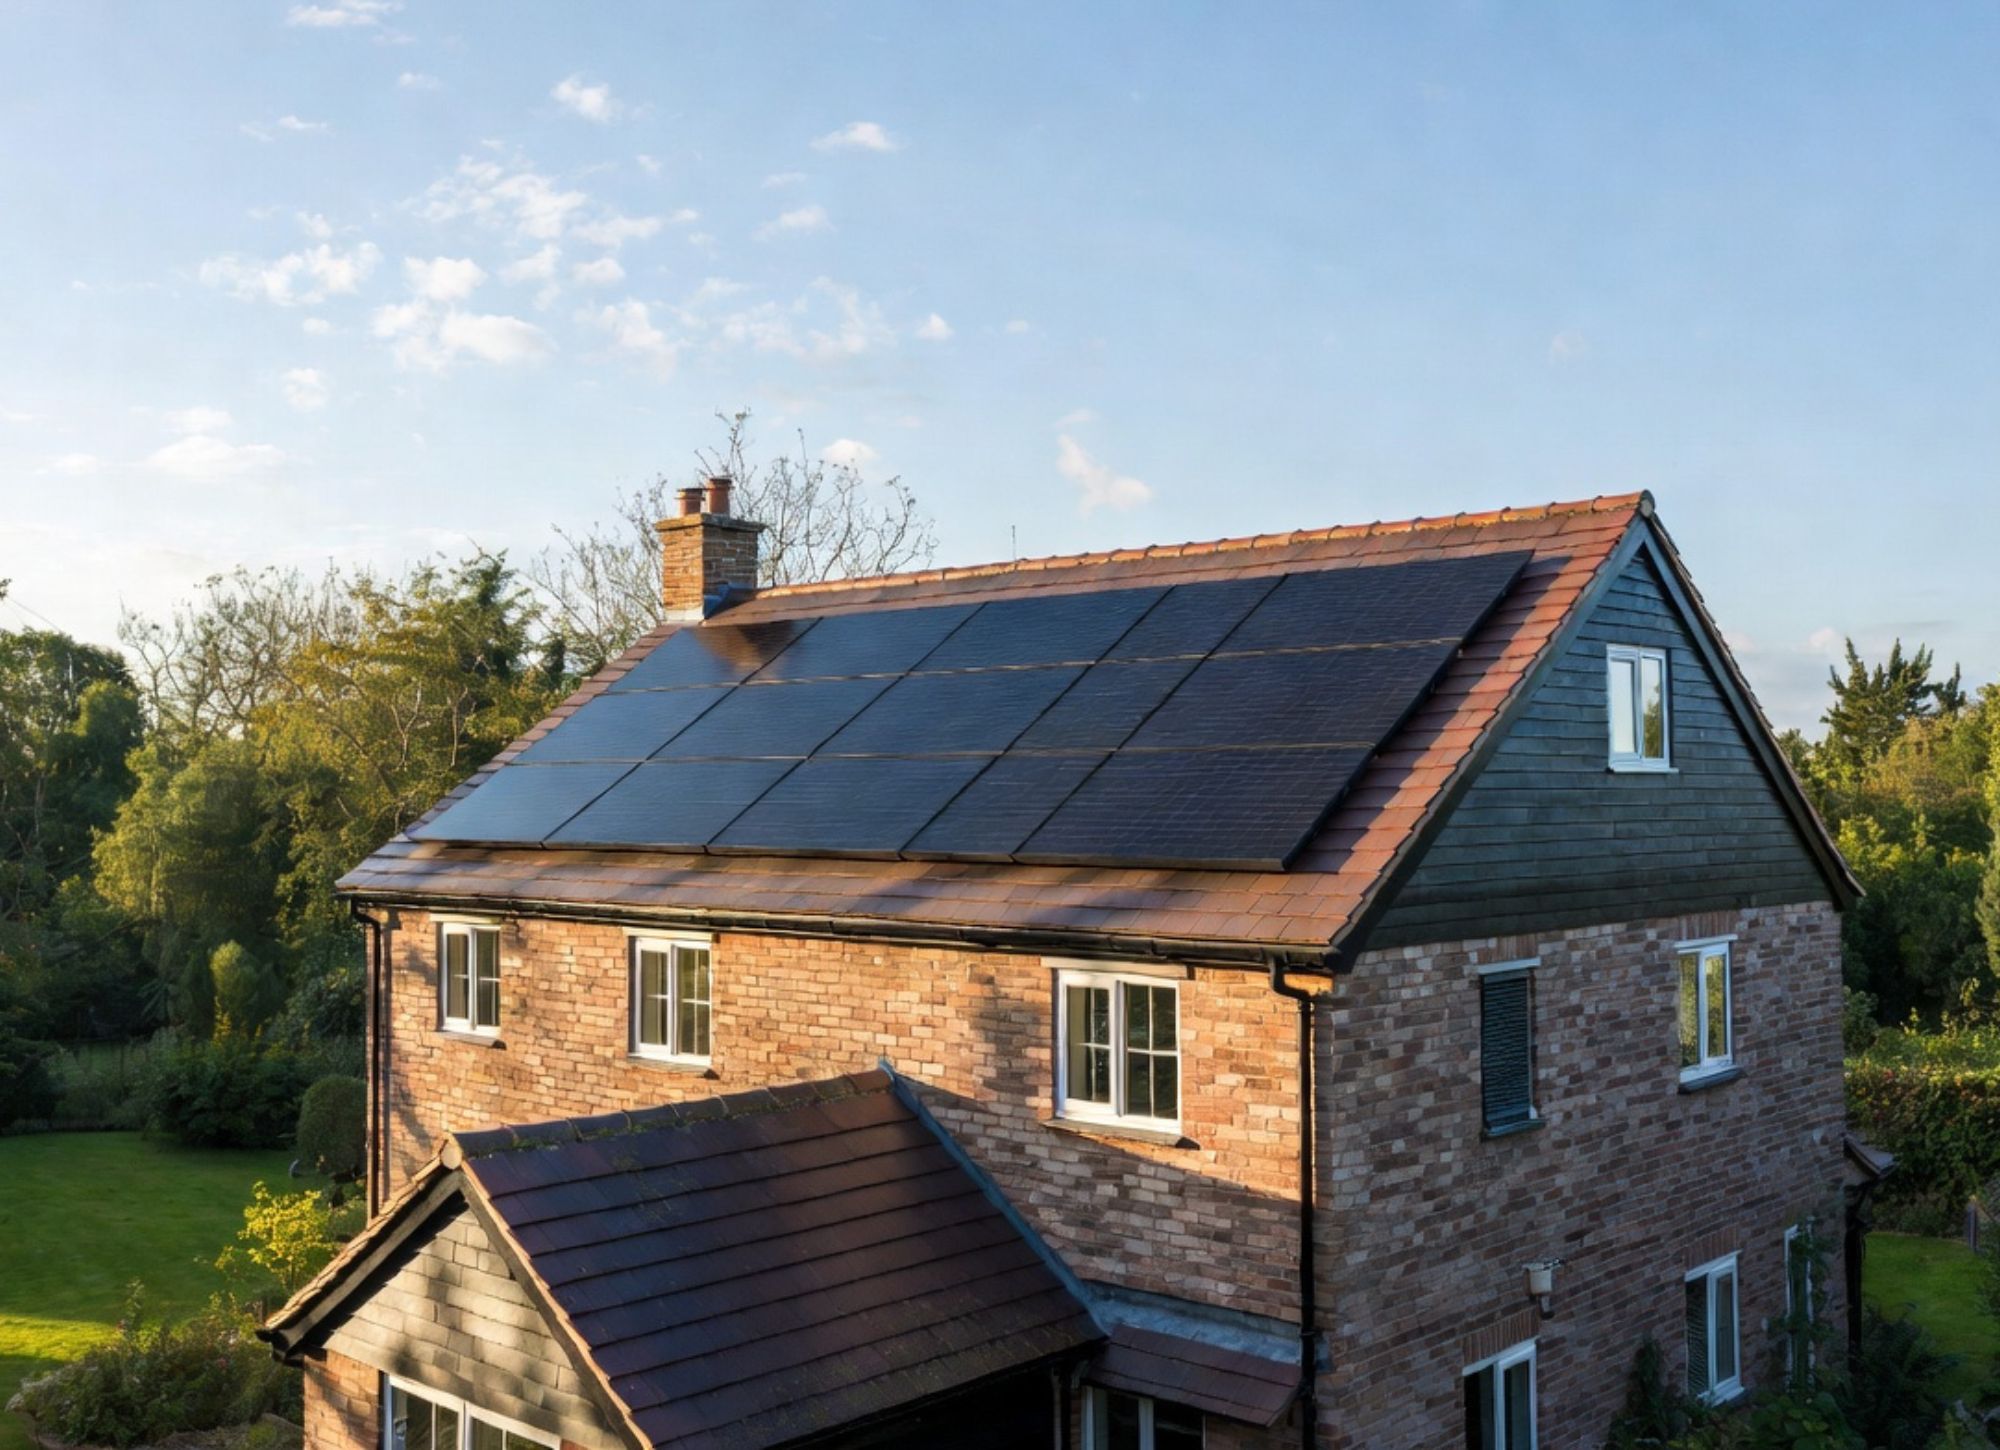
Yes, solar panels can absolutely be installed on a tile roof, and in fact a tiled roof is one of the most common and well-suited roof types for solar panel installation in the UK.
Whether your home has concrete tiles, clay tiles, or slate, there is a tried and tested mounting solution that allows a qualified installer to fit a solar PV system safely and securely without compromising your roof.
Millions of UK homes have tiled roofs, which makes installing solar panels on a tile roof one of the most well-understood processes in the industry.
Can You Put Solar Panels on a Tile Roof?
Yes, you can put solar panels on a tile roof, and it is one of the most straightforward roof types for a professional solar installer to work with. Concrete and clay tiled roofs are both highly compatible with standard solar mounting systems, and the installation process has been refined over many years of widespread UK residential solar deployment.
Slate roofs are also suitable, though they require a little more care during installation due to the more fragile nature of natural slate. Provided the roof structure is sound, the pitch falls within a workable range, and the roof faces a broadly southerly direction, a tile roof is an excellent foundation for a high-performing solar panel system.
It is worth being clear that tiles are not drilled through or permanently altered during a professional installation. Instead, specialist roof hooks are slid beneath individual tiles and secured to the roof battens underneath. The tiles are then replaced around the hooks, keeping the roof weathertight. This approach means the integrity of your tiled roof is fully maintained throughout and after the installation process.
Pros and Cons of Solar Panels on a Tile Roof
Here is a straightforward breakdown of what a tile roof means for your solar installation project:
Pros:
- Tiled roofs are one of the most compatible roof types for solar panel installation in the UK
- The standard hook-and-rail mounting system works well with both concrete and clay tiles
- Installation does not require permanent alteration or damage to the tiles themselves
- A well-maintained tiled roof provides a stable, long-lasting base for a 25-year solar system
- South-facing pitched tile roofs typically achieve excellent solar generation output
- Tiles can be reinstated or replaced individually if maintenance is ever needed after installation
- Widely understood by MCS-accredited installers, meaning competitive quotes and straightforward project planning
Cons:
- Older or fragile tiles may crack during installation if not handled carefully, requiring tile replacement
- Slate tiles, while compatible, need specialist handling and are more prone to breakage than concrete or clay
- A roof with significant age-related deterioration may need partial re-tiling before panels can be safely installed
- The pitch and orientation of the roof affect system performance, so not every tiled roof will generate equally
- Access to the roof battens beneath the tiles adds some complexity compared to flat roof installations
What Factors to Consider Before Installing Solar Panels on a Tile Roof?
Before booking a solar installation on your tiled roof, there are several practical factors that a good installer will assess and that you as a homeowner should understand. Getting these right at the planning stage makes the whole project smoother and protects your investment over the long term.
Roof Age and Tile Condition
The age and condition of your tiles is one of the most important starting points. Concrete and clay tiles in good condition can last 50 years or more, but tiles that are cracked, slipping, porous, or showing signs of significant weathering may need attention before installation begins.
Placing a solar system on a roof that requires re-tiling within the next five to ten years is not advisable, because removing and reinstalling panels to carry out roof repairs later adds unnecessary cost.
A pre-installation survey by a qualified installer will identify any tile condition concerns upfront so they can be addressed before the panels go on.
Roof Pitch and Orientation
The pitch and orientation of your tiled roof directly affects how much electricity your solar panels will generate over the course of a year. In the UK, a south-facing roof pitched between 30 and 40 degrees is considered the optimal configuration and will deliver the highest annual output.
East or west-facing roofs generate meaningfully less, roughly 15% to 20% lower output than an equivalent south-facing array, though they can still provide a very worthwhile return. North-facing roofs are generally not recommended for solar installation.
Installers use solar irradiance modelling tools to estimate the expected annual generation of any roof configuration before committing to a design.
Roof Structural Integrity
A standard solar panel array adds a dead load of approximately 15 to 20 kilograms per square metre to the roof structure. For most conventionally built UK homes, this is well within the capacity of the existing roof timbers and structure. However, for older properties, properties that have had previous loft conversions, or roofs that show signs of sagging or structural movement, a structural assessment may be advisable before installation.
A qualified installer will carry out a visual inspection during the survey and will flag any structural concerns that need to be addressed.
Tile Type: Concrete, Clay, or Slate
Different tile types require slightly different handling during installation. Concrete tiles are the most forgiving, being robust enough to withstand the careful lifting needed to fit roof hooks beneath them. Clay tiles are generally reliable but can be more brittle than concrete, so care is needed.
Natural slate is the most delicate of the three and requires an installer experienced in working with it to avoid unnecessary breakage. If your property uses a decorative or interlocking tile profile, it is worth confirming with your installer that the roof hooks they use are compatible with the specific profile of your tiles.
Planning Permission and Conservation Area Rules
Most residential solar panel installations in the UK fall within permitted development rights, meaning you do not need to apply for formal planning permission. However, if your property is a listed building or sits within a designated conservation area, additional restrictions may apply.
In these cases, the panels may need to be installed in a way that minimises their visual impact from public vantage points, and a formal application to your local planning authority may be required. An experienced installer will advise you on the planning position for your specific property before any work is committed to.
Roof Access and Scaffolding
Safe installation of solar panels on a tiled roof requires proper scaffolding to provide a secure working platform for the installation team. The cost of scaffolding is typically included in a comprehensive installation quote, but it is worth confirming this when comparing quotes.
Scaffolding is usually in place for two to four days for a standard domestic installation. Properties with complex roof geometry, limited garden access, or unusual height may incur higher scaffolding costs, and this is worth factoring into your budget from the outset.
How Are Solar Panels Installed on a Tile Roof?
Solar panels are installed on a tile roof following a clear sequence of professional steps, each of which contributes to a safe, weathertight, and high-performing system. Here is what the process looks like from start to finish.
Step 1: Pre-Installation Survey
Before any physical work begins, a qualified installer visits the property to carry out a detailed survey. This covers the roof pitch, orientation, tile condition, structural integrity, and the available wall or loft space for the inverter.
The installer takes measurements and photographs, assesses the electrical setup, and uses this information to design the optimal panel layout and system specification for your roof. The survey also confirms the scaffolding requirements and identifies any potential issues that need to be addressed before installation day.
Step 2: Scaffolding Erection
On the day before or the morning of installation, a scaffolding team erects a safe working platform around the relevant section of the roof. This gives the solar installation team secure footing and the ability to work safely at height throughout the project.
Scaffolding is erected in line with the Work at Height Regulations 2005 and remains in place until the installation is fully complete and signed off.
Step 3: Fitting the Roof Hooks
With scaffolding in place, the installation team carefully lifts individual tiles at the pre-planned hook locations and slides a stainless steel roof hook beneath the tile so that the hook’s fixing plate rests flat against the roof batten below.
Each hook is secured to the batten using appropriate structural screws, and the tile is then carefully replaced over the hook so that it sits naturally in its original position.
The hook protrudes slightly above the tile surface and provides the attachment point for the aluminium mounting rail. This process is repeated for each hook location across the planned array footprint.
Step 4: Mounting Rail Installation
Once all the roof hooks are in place, the installer attaches aluminium mounting rails horizontally across the hook positions. These rails form the structural spine of the solar array and are the component that the panels ultimately attach to.
The rails are levelled carefully to ensure the finished array sits flat and uniform, and they are spaced according to the panel dimensions specified in the system design. All rail connections are made with stainless steel fixings to ensure long-term corrosion resistance.
Step 5: Solar Panel Installation
With the mounting rails in position, the solar panels are lifted onto the roof and placed onto the rails. Each panel is secured using a combination of end clamps at the outer edges of the array and mid clamps between adjacent panels. DC cables from each panel are connected in the sequence specified by the system design, with cable clips used to keep the wiring neat and protected beneath the panel frames. The cabling is routed back to a single entry point into the roof void.
Step 6: Inverter and Electrical Connection
Inside the property, the DC cables from the roof are connected to the inverter, which is typically wall-mounted in the loft, utility room, or garage. The inverter converts the DC electricity generated by the panels into AC electricity that your home can use.
A qualified electrician makes the final connection between the inverter and the consumer unit (fuse board), installs a generation meter to record system output, and carries out a full electrical inspection in accordance with the requirements of BS 7671.
Step 7: System Commissioning and MCS Registration
The completed system is powered up and tested in full. The installer checks that each panel is generating correctly, that the inverter is operating within specification, and that all safety devices are functioning as expected.
The system is then registered with the MCS database, which formally certifies the installation and makes it eligible for Smart Export Guarantee payments. You receive your MCS installation certificate, all product warranties, and the electrical installation certificate before the installer leaves site.
Step 8: Scaffolding Removal
Once the installation is certified and all documentation is in order, the scaffolding is dismantled and removed from the property, leaving your home and garden fully clear. The whole process from scaffolding erection to removal typically takes two to four days for a standard domestic installation.
How Much Does It Cost to Install Solar Panels on a Tile Roof?
Installing solar panels on a tile roof in the UK typically costs between £5,000 and £9,500 for a standard domestic system, including panels, inverter, mounting hardware, cabling, scaffolding, and installation labour.
The exact cost depends on the system size, the number of panels, the inverter specification, and any additional work required such as minor tile replacement or roof repairs identified during the survey.
| System Size | No. of Panels | Output | Typical Cost | Annual Generation |
|---|---|---|---|---|
| Small | 6–10 panels | 2.5kWp–4kWp | £5,000–£6,500 | 2,200–3,500 kWh |
| Medium | 10–14 panels | 4kWp–5.6kWp | £6,500–£8,000 | 3,500–4,900 kWh |
| Large | 14–20 panels | 5.6kWp–8kWp | £8,000–£11,000 | 4,900–7,000 kWh |
Small System (6 to 10 Panels, 2.5kWp to 4kWp)
A smaller system suitable for a one or two-bedroom home or a property with limited roof space typically costs between £5,000 and £6,500. This size of system can generate between 2,200 and 3,500 kWh of electricity per year on a well-oriented south-facing roof in Southern England or the South West.
Medium System (10 to 14 Panels, 4kWp to 5.6kWp)
A medium system suited to a three-bedroom family home is the most commonly installed size in the UK and typically costs between £6,500 and £8,000. Annual generation for this size system is typically between 3,500 and 4,900 kWh, enough to cover a large proportion of the average UK household’s electricity consumption.
Larger System (14 to 20 Panels, 5.6kWp to 8kWp)
A larger system for a bigger property or a household with higher electricity demand, including those running an electric vehicle or considering a heat pump, costs between £8,000 and £11,000. These systems generate between 4,900 and 7,000 kWh annually and deliver the highest overall savings on electricity bills.
Adding Battery Storage
Adding a solar battery storage system to capture surplus daytime generation for use in the evenings costs an additional £2,500 to £5,000 depending on the battery capacity and brand. Battery storage significantly increases self-consumption, reduces reliance on the grid, and improves the overall financial return of the system over its lifetime.
Are There Different Tile Types That Affect Solar Panel Installation?
There are indeed different tile types that affect how solar panel installation is approached, and understanding the differences helps set realistic expectations for your project.
Concrete roof tiles are the most common tile type on UK homes built from the 1960s onwards and are the easiest to work with during solar installation. They are robust enough to handle the careful lifting involved in fitting roof hooks, and their uniform profiles make it straightforward to replace individual tiles if needed.
Clay tiles are slightly more varied in profile and can be more fragile than concrete, but they are well within the capabilities of an experienced installer. Many period properties in London, Brighton, Oxford, and Southampton feature clay tiles, and solar installation on these roofs is carried out routinely by qualified teams.
Natural slate is found on older properties throughout the South West, South Wales, and parts of London and is one of the most attractive roof materials available. It requires a skilled touch during hook fitting to avoid cracking, but an installer with experience in slate roofing will handle this as a matter of course. Spanish or Brazilian slate requires particular care due to its thinner profile compared to Welsh slate.
Interlocking concrete tiles, which have a distinctive shaped profile and interlock with adjacent tiles, need specific hook designs that accommodate their profile. A good installer will confirm compatibility as part of the survey process.
How Long Do Solar Panels Last on a Tile Roof?
Solar panels installed on a tile roof typically last between 25 and 40 years, and most modern panels come with a manufacturer’s performance warranty guaranteeing at least 80% to 90% of rated output after 25 years.
The mounting hardware used on tiled roofs, including stainless steel roof hooks and aluminium rails, is also designed for a 25-year-plus service life when installed correctly.
The tiled roof itself is a key variable. Provided the tiles are in good condition at the time of installation and remain well maintained throughout the system’s life, the roof and the solar system can coexist for decades without any significant intervention.
Periodic checks of the roof and panel condition, which a reputable installer will advise you on as part of ongoing maintenance, help identify any minor issues before they become costly problems.
Does Installing Solar Panels Void a Tile Roof Warranty?
Installing solar panels does not automatically void a tile roof warranty, but it is worth checking the specific terms of any warranty or guarantee that came with your roof if it was installed relatively recently.
Most tile manufacturer warranties cover defects in the tile materials themselves and are not affected by a properly executed solar installation that does not alter or damage the tiles.
Where a roofing contractor has provided a workmanship guarantee on a recent re-tile, it is sensible to notify them that a solar installation is planned so that there is no ambiguity about whether the workmanship warranty remains in force.
An MCS-accredited solar installer will carry out the installation in a way that is sympathetic to the existing roofing, and the use of non-penetrating tile hooks keeps any interaction with the tiles themselves to a minimum.
Get a Free Solar Panel Installation Quote From EE Renewables
If you have a tiled roof and you are ready to find out exactly how much a solar panel system could save you, EE Renewables is ready to help.
We provide expert solar panel installation and solar battery storage installation across Southern England, Greater London, South West England, and South Wales, including London, Brighton, Oxford, Southampton, Bristol, Cardiff, and all the surrounding areas.
Get your free, no-obligation solar installation quote from EE Renewables today and take the first step towards lower energy bills and a cleaner home.
We work with all tile types, including concrete, clay, slate, and interlocking profiles, and our experienced installation teams handle every project with the care and precision your roof deserves.
Every system we install is fully MCS-certified, meaning you receive complete warranty protection, access to Smart Export Guarantee payments, and the peace of mind that comes with a properly certified, professionally installed solar system.
A tiled roof is one of the best starting points for going solar in the UK. If yours faces broadly south and is in reasonable condition, the chances are that a well-designed solar system will serve you and your home exceptionally well for decades to come.
Frequently Asked Questions
Will solar panels on a tile roof affect my home insurance?
A professionally installed, MCS-certified solar panel system on a tiled roof should not negatively affect your home insurance. However, you should notify your insurer before installation takes place, as the panels represent an increase in the rebuild value of your property.
Most insurers will simply update your sum insured to reflect the addition of the solar system. Failing to inform your insurer could leave you underinsured in the event of a claim. Some specialist home insurance policies now include solar panels as standard, so it is worth reviewing your policy or shopping around if needed.
Can solar panels be installed on a north-facing tile roof?
Solar panels can technically be installed on a north-facing tile roof, but it is rarely recommended for UK properties. A north-facing array receives significantly less direct sunlight throughout the day and generates substantially less electricity than a south, east, or west-facing equivalent. The financial return is likely to be poor, and most qualified installers will advise against it.
If your property’s primary roof faces north but you have a rear extension, garage, or outbuilding with a more favourable orientation, that may be a more productive location for the panels.
How many solar panels can fit on a standard tiled roof in the UK?
The number of solar panels that fit on a standard tiled roof depends on the usable roof area after accounting for windows, chimneys, valleys, and required perimeter clearances. A typical three-bedroom semi-detached house in the UK has enough south-facing roof space for 10 to 14 panels.
A detached house with a larger roof may accommodate 16 to 20 panels or more. Your installer will calculate the maximum array size during the pre-installation survey and design the layout to maximise both generation and aesthetics within the available space.
Do tile roof solar panels require special maintenance?
Solar panels installed on a tile roof require very little maintenance under normal circumstances. The panels are designed to be self-cleaning to a large degree, as rainfall washes most surface dust and debris away over time. In areas with heavy tree cover or significant bird activity, periodic cleaning using a soft brush and clean water can help maintain output.
It is also good practice to have a qualified installer carry out a visual inspection every three to five years to check the condition of the mounting hardware, cable connections, and roof hooks beneath the tiles. The inverter, which is the component most likely to require attention over the system’s life, typically has a lifespan of 10 to 15 years and may need replacing once during the panels’ full service life.
Can I install solar panels on a tile roof with a chimney or skylights?
Yes, solar panels can be installed on a tile roof that has a chimney or skylights, though these features reduce the available roof space and need to be carefully accounted for in the array design. Building regulations and good installation practice require a minimum clearance around chimneys and roof penetrations to allow safe access, maintain proper ventilation, and avoid shading the panels.
An experienced installer will design the panel layout to work around these features efficiently, and in most cases a practical and attractive array can still be achieved. If shading from a chimney affects part of the array significantly, the use of individual panel optimisers or microinverters can help mitigate any output loss caused by partial shading.
